Writing an internal Terraform provider from A to Z
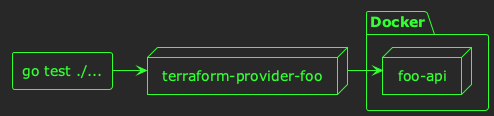
I recently wrote a Terraform provider for an internal API at Typeform, and followed the development from writing the provider, to deploying into Terraform CI infrastructure, and building Terraform around it. Some of these steps were a little tricky, or required me to trawl through documentation, and I thought to myself: “I hope this is easier next time I do it!”
Well, in the interests of preserving what I’ve learned for my future self, this post describes what I learned about the “A to Z” of building, deploying, and running an internal Terraform provider. If you find yourself needing to do a similar thing, then I hope this post helps you to 🤞
💡 In this post I’m just going to cover the basic use-case of developing a provider for a single Terraform resource; I won’t be covering data sources, or anything more exotic.
Writing the provider
When writing a Terraform provider–internal or not–the first place to start is with the official documentation. This was my primary source of information throughout development, although hopefully there are a few short-cuts below that will save you some time. The second thing to do is to clone the terraform-provider-scaffolding-framework repository; this is your starting point for provider development.
In this repo you will find a provider.go containing metadata about your provider, and a schema for the arguments your provider can take as configuration. When you start building your provider, you’ll also need a file per resource. Let’s take the example for a foo resource, which you’ll probably write in a file called foo_resource.go. This file will have a few key elements, along with its associated tests in foo_resource_test.go.
The resource data model
In foo_resource.go, you’ll need to define the data model of your resource (i.e. the configuration its Terraform resource accepts) in two ways:
- As a Go data structure for serialising and deserialising the data to HCL.
- As a schema of fields and data types, defined using a Hashicorp API.
The Go data structure is just a plain old Go object, with some special field tags. For example:
import "github.com/hashicorp/terraform-plugin-framework/types"

type FooResourceModel struct {
        Bar types.String `tfsdk:"bar"`
        Id  types.String `tfsdk:"id"`
}
The schema of the data model is defined in a method of a struct representing the implementation of your resource:
import (
        "github.com/hashicorp/terraform-plugin-framework/resource"
        "github.com/hashicorp/terraform-plugin-framework/resource/schema"
)

type FooResource struct {}

func (r *FooResource) Schema(ctx context.Context, req resource.SchemaRequest, resp *resource.SchemaResponse) {
        resp.Schema = schema.Schema{
                MarkdownDescription: "Foo resource",

                Attributes: map[string]schema.Attribute{
                        "bar": schema.StringAttribute{
                                MarkdownDescription: "This is a good example",
                                Optional:            true,
                        },
                        "id": schema.StringAttribute{
                                Computed:            true,
                                MarkdownDescription: "The resource's ID",
                                PlanModifiers: []planmodifier.String{
                                        stringplanmodifier.UseStateForUnknown(),
                                },
                        },
                },
        }
}
💡 Note the use of
stringplanmodifier.UseStateForUnknown()for the ID field, which ensures that IDs are stored in the statefile correctly when you’re creating new resources (assuming your API assigns new IDs when it creates resources).
CRUD functions
Once you’ve defined the data model of your resource, you’ll need to write implementations for create, read, update, and delete functions. All of these functions follow a similar pattern, which I’ll illustrate below for the create function.
Your create function will need to:
- Read the resource configuration from the Terraform plan
- Map the configuration to your API’s data model
- Send an HTTP request to create the resource
- Map the HTTP response back to the data model of your Terraform resource
- Update the statefile with the result (which will save your resource’s ID, if it’s created by your API)
For example, your create function could look like this:
func (r *ExampleResource) Create(ctx context.Context, req resource.CreateRequest, resp *resource.CreateResponse) {
        var plan FooResourceModel
        resp.Diagnostics.Append(req.Plan.Get(ctx, &plan)...) // Get the configuration of your resource from the plan.
        if resp.Diagnostics.HasError() {
                return
        }

        createdFoo, err := createFoo(ctx, plan) // Create your resource using the configuration in the plan.
        if err != nil {
                resp.Diagnostics.AddError("Client Error", fmt.Sprintf("Unable to create foo, got error: %s", err))
                return
        }

        updatedPlan, err := updatePlan(ctx, plan, *createdFoo) // Update the data in the plan with the response from your API.
        if err != nil {
                resp.Diagnostics.AddError("Client Error", fmt.Sprintf("Unable to update plan, got error: %s", err))
                return
        }

        resp.Diagnostics.Append(resp.State.Set(ctx, updatedPlan)...) // Save the updated plan data in the statefile.
}
This function reads the configuration from the plan, uses it to create a resource in your API, and saves the response in the statefile.
The createFoo() function will take the Terraform resource data model, map it to your API data model, and send the HTTP request. It returns the response from your API using your API’s data model. The updatePlan() function maps this data model back to your Terraform resource data structure, so that it can be saved in the plan.
This is similar for the other functions:
Readwill take data from the plan (probably just theID),GETthe resource from your API, and update the state with the response.Updatewill take the data from the plan, send aPUTrequest to your API, and update the state with the response.Deletewill take the ID from the plan, and send aDELETErequest to your API.
Integration tests
As you’re writing the implementation for your CRUD functions, you’ll want to test the full Terraform lifecycle of provisioning new resources, updating them, and deleting them. The best way to do this is via an integration test (or acceptance test in Hashicorp parlance). If you’re building a Terraform provider for an internal API, you can run the API locally, and test your Terraform provider against it directly:
Hashicorp provide a good framework for this, so your tests should be easy to write. This framework uses the concept of “test steps” which each represent a single terraform plan and terraform apply, with shared state between them. The test steps are executed in the order they are defined, which means you can write a single Go test which:
- Creates a new resource
- Updates the resource
- Deletes the resource
The testing framework automatically deletes resources in the test teardown, so you only need to worry about defining test steps for the create and update steps. And, since your Read() function will be called every time a plan is run, this test will effectively test your entire provider! 🎊
An example test might look like this:
import (
        "fmt"
        "testing"

        "github.com/hashicorp/terraform-plugin-testing/helper/resource"
        "github.com/hashicorp/terraform-plugin-testing/knownvalue"
        "github.com/hashicorp/terraform-plugin-testing/statecheck"
        "github.com/hashicorp/terraform-plugin-testing/tfjsonpath"
)

func TestAccExampleResource(t *testing.T) {
        resource.Test(t, resource.TestCase{
                Steps: []resource.TestStep{
                        {
                                Config: `
resource "internal_foo" "test" {
  bar = "what a good test"
}`,
                                ConfigStateChecks: []statecheck.StateCheck{
                                        statecheck.ExpectKnownValue(
                                                "internal_foo.test",
                                                tfjsonpath.New("bar"),
                                                knownvalue.StringExact("what a good test"),
                                        ),
                                },
                        },
                        {
                                Config: `
resource "internal_foo" "test" {
  bar = "yes, it's rather good"
}`,
                                ConfigStateChecks: []statecheck.StateCheck{
                                        statecheck.ExpectKnownValue(
                                                "internal_foo.test",
                                                tfjsonpath.New("bar"),
                                                knownvalue.StringExact("yes, it's rather good"),
                                        ),
                                },
                        },
                },
        })
}
As you can see, the terraform-plugin-testing library allows you to define test steps by declaring Terraform resource definitions, and then inspecting the state afterwards to perform assertions.
Deploying the provider
Once you’ve written your provider, you’ll need to deploy it into your Terraform CI infrastructure so that it can be used in your Terraform code. Normally, Terraform providers are deployed via a Terraform registry. However, if this is your first internal Terraform provider, you might not have a private registry. You could set one up, but I’m going to describe an alternative below which facilitates the deployment of your internal provider without needing a registry.
Fundamentally, a Terraform provider is a compiled Go binary that is controlled by Terraform via RPC. All you need to do to deploy it is compile it, copy it to where you’re running terraform, and install it locally. A convenient way to do this is via a GitHub release:
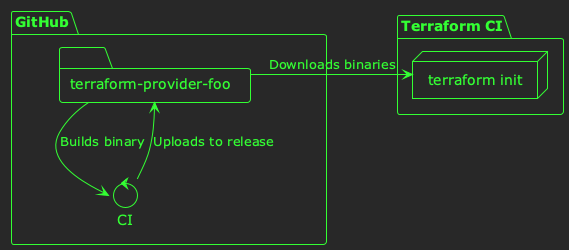
When you create a release in GitHub, your CI can compile your provider binaries, and upload them to the release as downloadable artifacts. Then, before you run terraform init in your Terraform infrastructure, you can download and install the provider.
Compiling and uploading the provider binaries can be achieved with a simple GitHub Actions workflow that uses goreleaser:
name: Release
on:
  push:
    tags:
      - 'v*'
permissions:
  contents: write
jobs:
  goreleaser:
    steps:
      - uses: actions/checkout@v4
      - uses: actions/setup-go@v5
      - uses: goreleaser/goreleaser-action@v6
Installing the provider
Once your provider is being compiled and deployed as a downloadable artifact to a GitHub release, it’s ready to be installed wherever you’ll be running terraform init, terraform plan, and terraform apply. This is probably your Terraform CI server, but it could be anywhere. As long as it has access to your GitHub repo (e.g. with a GITHUB_TOKEN environment variable), it can download your provider binary and install it locally.
Installing your provider is a little tricky, because the default Terraform behavior is to try downloading it from a registry. If we want to install the provider without a registry, we need to do two things:
- Download the plugin, and store it in a special directory.
- Configure Terraform to look for the provider on the local filesystem, rather than in a remote registry.
Downloading the plugin
In order to download your plugin, you’ll first need to identify the latest GitHub release and the download URL of the correct binary, and then download it to the special location Terraform expects. I suggest doing this with a shell script, which we can build up step by step.
First, identify the platform you’re running on in the format <os>_<cpu-architecture>:
function get_arch() {
    if [[ "$(arch)" == "x86_64" ]]; then
        echo "amd64" # This helps us build the correct download URL for GitHub.
    else
        arch
    fi
}

platform="$(uname | tr '[:upper:]' '[:lower:]')_$(get_arch)"
Next, we’ll query the GitHub API to find the details of the right artifact for the latest release:
json=$(curl https://api.github.com/repos/<organisation>/terraform-provider-foo/releases/latest \
     -H "Accept: application/vnd.github+json" \
     -H "Authorization: Bearer $GITHUB_TOKEN" \
     -H "X-GitHub-Api-Version: 2022-11-28" 2> /dev/null| \
           jq --arg platform "${platform}.zip" -r '.assets[] | select(.name | endswith($platform))')
This should give you some JSON that looks something like this:
{
  "url": "https://api.github.com/repos/acme/terraform-provider-foo/releases/assets/2542153478",
  "name": "terraform-provider-foo_1.0.0_darwin_arm64.zip",
  "uploader": {
    "login": "github-actions[bot]",
    "type": "Bot"
  },
  "content_type": "application/zip",
  "state": "uploaded",
  "browser_download_url": "https://github.com/acme/terraform-provider-foo/releases/download/v1.0.0/terraform-provider-foo_1.0.0_darwin_arm64.zip"
}
Finally, you can download the artifact to the special location that Terraform will use to search for providers locally. This is a directory in the working directory of your project in a path like terraform.d/plugins/<host>/<namespace>/foo, where:
<host>can be a hostname of your choosing, e.g.acme.com<namespace>can be a category of your choosing, e.g.internalfoois the name of your provider
Using the JSON from GitHub, and this download directory, you can download your artifact as follows:
url=$(echo "$json" | jq -r '.url')
name=$(echo "$json" | jq -r '.name')

wget --header "Authorization: Bearer $GITHUB_TOKEN" --header "Accept: application/octet-stream" -O "terraform.d/plugins/<host>/<namespace>/foo/${name}" "$url"
Configuring Terraform to use your local filesystem
In order for Terraform to use your local copy of the provider, you need to configure it to use an implied local filesystem mirror. This involves using a custom config file for the Terraform CLI, and telling terraform where to find it.
The config file itself can be stored anywhere, but must have a *.tfrc file extension. Let’s assume you use a file called terraform.tfrc in the working directory of your project:
provider_installation {
  filesystem_mirror {
    path = "/path/to/your/project/terraform.d/plugins"
    include = ["<host>/<namespace>/foo"]
  }
  direct {
    exclude = ["<host>/<namespace>/foo"]
  }
}
This file tells Terraform to explicitly search for your provider (<host>/<namespace>/foo) in the terraform.d/plugins directory we created in your working directory. It also explicitly tells Terraform not to search for your provider in a registry.
Once you’ve created this file, you just need to tell terraform to use this file with an environment variable when you run it:
TF_CLI_CONFIG_FILE=$(pwd)/terraform.tfrc terraform init
Using the provider
Now you’re good to go to use your provider as your normally would. For example, you might have a providers.tf that looks like this:
terraform {
  required_providers {
    appcatalog = {
      source = "<host>/<namespace>/foo"
    }
  }
}

provider "foo" {
  // Your provider config here.
}
Summary
So, there you have it! If you want to write a simple, internal provider, and deploy it without worrying about running an internal Terraform registry, then I hope this post helps.
Happy Terraforming! 👷